

Can You Build An App Using Only React Native
How to Make an App in React Native?
You have a big idea, and you are waiting to implement it for creating an app on both Android and iOS. What can be a better option than React Native, the mobile app framework that disrupted the mobile app development world for good?
How to Build a React Native App?
This article delineates the lessons mastered during a 13-year journey, running a software development firm and building several mobile apps. This article is about to disclose the unknown secrets of realizing your dreams and using React Native as the favored framework for creating a mobile app. It will discuss practical measures as per our own experience in developing mobile apps and tell you about tips that worked for us.
This is what this article delves into.
- What is React Native?
- The Advantages of Using React Native for a Mobile App
- The 13 Steps to Create a React Native Mobile App
- Write Down Your High-level Idea
- Wireframe, Mockup, and Prototype Your App
- Obtain Feedback from Customers
- Create Your App Backend
- Code Your App Frontend
- Coding Your React Native App
- Create Your App Landing Page
- Implement Your App Analytics Dashboard
- Beta Test Your App with Real Users
- Optimize Your App for SEO
- Launch Your App
- Promote Your App to Reach the Right Users
- Improve Your App with Customer Feedback
The most accessible devices in the world, mobile phones are seeing a constant rise in use. It might not sound credible when we say that there are more mobile phones than people, but that is the reality. Though the number of mobile phones is increasing, developing a mobile app is neither inexpensive nor easy. This blog post brings forth simple steps to expedite setting an app and saving your money through this tutorial.
Contents
- 0.1 What is React Native?
- 0.2 Why use React Native to Create a Mobile App?
- 0.3 Before you begin to code, read this. Seriously!
- 0.3.1 # I know it's hard, but don't begin to code right now
- 0.3.2 # Keep it straightforward and begin with an MVP
- 0.3.3 # Obtain customer feedback as quickly as possible
- 0.4 The 13 Steps to Create a React Native Mobile App
- 0.5 1. Write Down Your High-level Idea
-
- 0.5.0.1 Utilize the Business Model Canvas
- 0.5.0.2 Startup Owners Manual
- 0.5.0.3 Prepare a Budget
-
- 0.6 2. Wireframe & Mockup & Prototyping
- 0.7 3. Obtain Feedback from Customers
- 0.8 4. Create Your App Landing Page
- 0.9 5. Create Your App Backend
- 0.9.1 Backend as a Service Platforms
- 0.9.2 Custom Backend
- 0.10 6. Native vs. Hybrid Development
- 0.11 7. Building your React Native App
-
- 0.11.0.1 Android
- 0.11.0.2 iOS
-
- 0.12 8. Implement Analytics Dashboard
- 0.13 9. Beta Test Your App with Real Users
- 0.14 10. Optimize Your App for SEO
- 0.15 11. Launch Your App
-
- 0.15.0.1 Legal Aspects
- 0.15.0.2 App Publishing
-
- 0.16 12. Promote Your App to Reach the Right Users
- 0.17 13. Improve Your App with Customer Feedback
- 1 Conclusion
- 1.1 FAQ
- 1.2 What is React Native?
- 1.3 Why use React Native?
- 1.4 What are the steps to create a React Native app?
What is React Native?
Also called RN, React Native is a well-known mobile app framework based on JavaScript. It permits you to create natively-rendered mobile apps on both Android and iOS platforms. The framework allows you to build an app for different platforms by making use of the same codebase.
In 2015, Facebook released the RN for the first time as an open-source project. In just two years, it turned out to be among the best solutions used for mobile development. Some of the most popular mobile apps globally – Facebook, Instagram, and Skype are powered by RN development.
Checkout this video from LevelUpTuts to know more about React Native.
Why use React Native to Create a Mobile App?
- Cross-Platform
React Native is compatible with both iOS and Android More than 90% of the code is cross-platform. Therefore, developers simply need to make one app, and finally, two apps are created. As a result, you are saving time and money, which would otherwise have been used for making separate apps.
- Time-and Cost-efficient
With React Native, you can have two apps at a go for a little over half the price of building one version. Firms do not have to decide which version to create and launch first, owing to the cost incurred for building two individual apps. Additionally, once the apps are created and launched, updates and maintenance are conducted on both applications simultaneously, saving future costs.
- Hot Reload allows checking changes instantly
Developers can check the changes they have made to the code in another window, showing live preview at the same time. For this, they use "hot reloading". It offers real-time feedback and hence is a significant advantage to developers.
- Superb Performance
React Native apps are very similar to native apps built on a specific Android or iOS platform when it comes to performance. Since the programming language is optimized for mobile devices, RN apps are also fast. Rather than primarily utilizing the CPU, RN apps use the GPU. It makes them faster than other cross-platform hybrid technologies.
- Over-the-Air updates
Using React Native, as you create updates and improvements for the users, developers apply them via Over-the-Air updates that get administered even as users are making use of the app. When the app is opened for the next time, the update is prepared for the user. There is no more a requirement to update the application manually via the app stores and have them approved by Android or Apple. This saves time, making the procedure smoother.
- Better Flexibility
React Native comes with a type of interface that allows various team members on a development team to start where another developer left off and resume building the app. It enhances flexibility in the group, making updating and upgrading the mobile app an easier task. Testers also find this flexible as they can create testing scenarios easily. These benefits also save money and time.
- Open-Source and there is no Vendor Lock-In
If you wish to or it becomes imperative to shift the app to a different development framework later, app developers do not need to begin from the scratch. The app can be exported from RN and moved into Xcode or Android Studio by developers, who can continue from there. This is a big advantage of making use of RN for developing mobile apps.
Before you begin to code, read this. Seriously!

Check out the ideas that we learned the hard way and have simplified for your convenience to save your dollars.
# I know it's hard, but don't begin to code right now
We started to code our first product in 2004 without any validation from customers. It took a couple of years, and when it was ready, the product did not have a market need. Even though the product featured all the traits you can imagine and was excellent in nature, the customers did not use it. We will always remember this and will avoid making the same mistake again.
The first lesson learned the hard way is that you ought not to begin coding right away. The costliest piece of the equation is coding, and you can have substantial savings. Coming across developers is difficult and expensive. The rate/hour will range from $15/hour in offshore development to $200/hour in Silicon Valley.
Therefore, before coding an app, ensure to write down your idea at first, conduct market research, design a few sketches, and receive feedback with potential customers. This uncomplicated rule can save you hundreds of dollars, and you can stay away from creating an app that nobody wants to use.
# Keep it straightforward and begin with an MVP
The second thing to keep in mind is that the cycle of development needs to be small. A Minimum Viable Product (MVP) should be ready in a maximum of 3 months. You probably think that your app has all these features, and it is not possible to get it ready in 3 months. Here, before moving ahead, you must understand customers and gather real-life data because you do not know what features to make a product successful. The article Business Model Canvas is helpful to clarify how to create an MVP.
# Obtain customer feedback as quickly as possible
The app's hypotheses should be validated as quickly as possible and at the minimum cost imaginable. It is better not to wait until your application is coded fully before showing it to potential users. The reason is clear; in case your hypotheses require adjustment or are incorrect, you may not be left with enough financial resources to resume the project. It is suggested that you take every care to gather feedback from customers in the initial phase of the project and define the application needs once again as per real-life data. When you do this, you enhance the chances of launching a successful app.
The 13 Steps to Create a React Native Mobile App
Now it is time for you to learn the step-by-step procedure to create a successful application. Read on for more details.
1. Write Down Your High-level Idea
On app stores, thousands of applications get released daily. So, you have to be unique to be successful. Writing down your high-end objectives is the first phase to create a popular mobile application. It would be best if you had a goal to make sure that you do not drift around.
Utilize the Business Model Canvas
In 2004, our business plan had over 100 pages and wrapped all possible scenarios. It is better not to follow such an approach and stay away from the business's complicated and vast plans. In mobile applications, time to market plays a significant role. A business plan will slow down this procedure and not assist you in accomplishing this objective. Additionally, most of the estimations will be wrong.
You can make use of the business model canvas to create your high-end plan. This template covers the most important aspects of a business, such as customer segments, value propositions, revenue, etc. If you possess knowledge about the company, creating the first version in about 2 hours is possible.
Startup Owners Manual
Purchase the Startup Owners Manual to develop your venture. It is a checklist of how you can make a successful firm. It is similar to a car manual, but it is for your firm. With more than 500 pages, the book gives answers to all your questions. Read it during your vacations, but treat it as a manual and not like a book.
Prepare a Budget
For developing your mobile application, you should define your budget. You must be well aware of the amount you are planning to spend right from the beginning of the project.
Prices can get out of control quickly. Despite considering an offshore software development company at $15.00/hour, which is relatively low, a budget of $25k will let only a couple of developers to work for less than four months on the project. It is, therefore, essential to reduce the cost of every mistake you commit. You can quickly lose control of your budget. Hence, validating is crucial before app coding.
2. Wireframe & Mockup & Prototyping
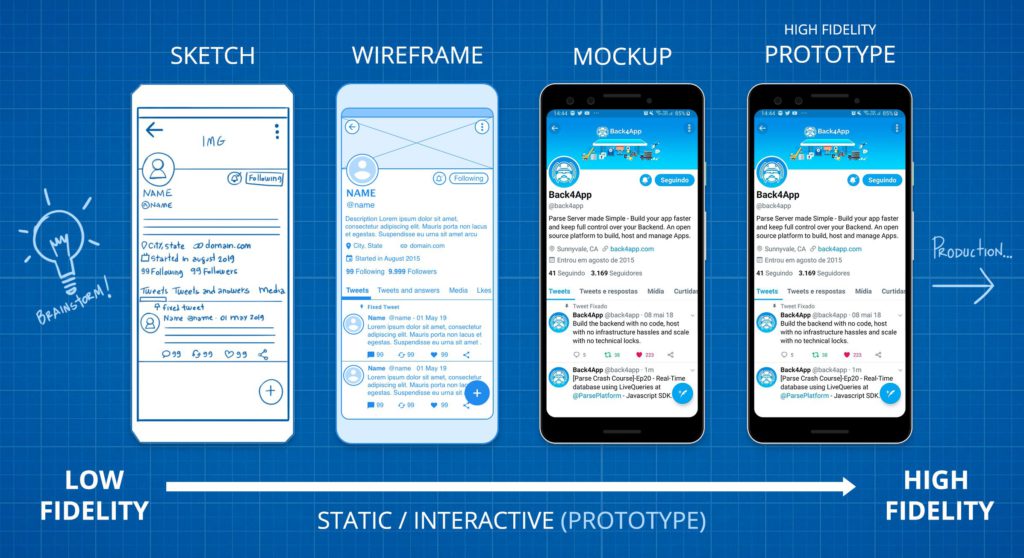
The first thing you need to know in this context is that wireframe, mockup, and prototyping are completely different phases in app creation.
| Wireframe | It is a sketch, showing how the app will appear. |
| Mockup | A mockup is colorful and features animated pictures. |
| Prototype | A prototype lets the users do things like pressing a button and using the application. |
Check below to get an insight into an example of wireframe, mockup, and prototype. Spending time on this step can save you both money and time. Another important reason behind undertaking this step is that you will learn; things will turn clear for you, and expedite market validation.
The reasons for designing your app are:
- It is enjoyable, and you can make the most of the procedure.
- It is faster to alter design than altering code.
- The money spent on a designer is generally less costly than the money spent on a developer.
- If you want, you can do it yourself.
3. Obtain Feedback from Customers
With your prototype ready, you can perform the first round of customer feedback. Show it to potential customers and friends. Mentioned below are some ways to do that:
- Share it with friends and family members
- Visit meetup events
- Share the app with founders and startups at coworking spaces
- Let real customers take a look at it
- Visit pitch competitions
- Advertise the product on LinkedIn, Facebook, and Twitter
4. Create Your App Landing Page
Suppose you produce a landing page for the app. In that case, you can target your audience, proffer them something valuable, and convert a higher percentage of your visitors into downloaders of your app. At the same time, gain data about who they are and on what they have converted. Landing pages are also relevant because they enhance your reliability and toughen your brand. Many tools can help you create a landing page, and they are easy to find on the internet.
5.Create Your App Backend
Now it is time to code the app. Here you must know that mobile apps are like an iceberg. There are two pieces:
- Frontend – The piece that users can see
- Backend – The piece that users cannot see
Usually, the majority of the development is going to focus on the backend. It is because the backend is going to store/retrieve data, run most of the business rules, and create the APIs.
Two main paths get involved in generating a backend.
- Utilize a backend platform
- Custom coding
Backend as a Service Platforms
The process of creating a backend can be increased by using platforms for speeding up development. Repetitive tasks, such as social login, authentication, data backup, etc. can be automated using a Backend as a Service. The significant advantages of utilizing a BaaS are as follows.
- Cost – Less number of engineering hours
- Speed – Decreased time to market
- Infrastructure – Worrying about cloud management can be avoided
Custom Backend
The primary benefit of a custom backend is the flexibility it offers. The drawback is the higher cost compared to a backend service and a longer time to develop until you launch your MVP.
6. Native vs. Hybrid Development
Your app's success depends mostly on the app's frontend. A successful app needs to be clean, functional and appealing to raise interest. It is the first thing users will check whether you are developing a Hybrid, Web, or Native mobile app.
Native applications work on the devices' operating systems, need to be functional, and have complete access to hardware. The significant advantages of native applications are the speed; they feature the best feel and look, and work offline. Web applications have restrained functionality and lack access to the hardware. The key benefits are a low cost of development, speedy time to market, and non-requirement of download. Hybrid applications come with a web view, which runs within a native application. .
7. Building your React Native App
Before coding your React Native App, please make sure you know the basics of JavaScript. No prior knowledge of iOS, Android, or React is required. If you have it, it will not hurt either. An easy way to start your first React Native app is using a CLI – Command Line Interface.
The next steps is to setup your environment. Experienced developers should use the React Native CLI. Beginners should install the Expo CLI. For this tutorial, let's assume you don't have prior experience and use the ExpoCLI. Follow the steps below:
- Install Node12 LTS;
- NPM install the Expo CLI;
- Run the command below;

- Install the Expo client to your iPhone or Android device;
- Make sure the network is the same for your phone and computer;
- Use the QR code to open your project;
The requirements to build an Android an iOS application are different. This tutorial will cover the basics of both operating systems.
Android
- Download the Android SDK;
- Configure the Android SDK;;
- Configure the Android Studio;
- Install APIs;
- Select the platform you need React-Native support;
- Select SDK Build Tools;
- Select Android SDK Tools;
- Select Google Play Service;
- Use a real device (preferred) or emulator to test the app;
iOS
- Prepare your pocket! Developing with iOS is always more expensive!
- Make sure you have a MacOS and iPhone;
- Install Xcode;
- Make sure you have an Apple Developer Account. It costs $99/year.
- Plug in device via USB;
- Select your project in the Xcode Project Navigator;
- Build and run your application;
- Connect to the development server;
- Open the developer menu;
- Enable Live Reload;
The instructions above are the foundation to create your React Native application. The following references are helpful and will provide more detailed guidelines:
- React Native Official Website
- Real-Life Example of Building a React Native Application
- What you need to know to start building mobile apps in React Native
8. Implement Analytics Dashboard
Mobile application analytics is essential for multiple reasons. It gives you an idea about how customers are using your application, the components of the app that they are interacting with, and what they do while using that app.
You can utilize this information to make a plan of execution for upgrading your product. For instance, refining existing features or adding new ones so that the lives of the users would become easier. Withdrawing components that the customers do not use is another example.
With app analytics, you also get to learn if you are attaining your objectives, whether it is the revenue, downloads, or any other KPI necessary for your venture. Real-life data is the most suitable solution to optimize your application.
9. Beta Test Your App with Real Users
With a mobile application that is adequately tested, you can increase your customer satisfaction and review ratings. When you spend time on this step, you come across valuable referrals and increase the download rate. Before publishing your app, take a look at some essential testing.
10. Optimize Your App for SEO
A lot of people tend to miss this step.
The app stores are home to massive competition, and users should discover you fast. A great way to enable that is to optimize your application and get a good SEO ranking. The factors to influence your ranking are elaborately mentioned below:
- Keywords
- App Title
- Quality backlinks
When your app has been published, your reviews & ratings and the number of downloads will also impact the SEO. Thus, make sure that your early users are satisfied so that you grow.
11. Launch Your App
Ok, you are almost there.
Legal Aspects
Before launching, kindly make sure that the Privacy Policy and Terms of Use are ready. Since lawyers in the USA are expensive, prepare your pocket in case you are approaching a US law firm. Or, you can buy a template and adopt it.
App Publishing
The final step involves publishing your application in the stores. The publishing procedure is more straightforward and much more relaxed with Google Play than Apple Store.
12. Promote Your App to Reach the Right Users
Since you have worked hard to create your app, kindly make sure you advertise it. Read the following tips:
- Utilize Facebook, LinkedIn, Twitter and other social media.
- Begin a blog.
- Reply to questions on Reddit and Quora.
- Make a video for your applications.
- Post a job on Indeed.
- Make a presentation on Slideshare.
13. Improve Your App with Customer Feedback
This step is unending. The higher understanding and data you have on your users, the better decisions you can make for your app's future. A magic spell does not exist, and for increasing the use of your application, you should work hard and follow a systematic monitoring routine. It would help if you tried to get customer feedback daily. If you spend 1 hour every day obtaining customer feedback, just think how much you will get to know after 365 days. It is essential to get qualitative and quantitative data about your users.
Conclusion
Making your React Native app live is anything but easy. You have to organize yourself, allocate financial resources, and time to begin a project on the mobile application.
Before coding the app, make sure to make high-end specifications, design the app, and have a word with customers. When you are sure that your product has market demand, select an operating system, and develop your MVP.
Before launching your React Native app, real users should get the chance to test it. You also need to optimize the app before launching. When you are on the Internet, advertise the application, and interact with your users as much as possible. If you can understand your users, your app will be successful. .
Has this article assisted you to identify the way to create a React Native mobile application? Let us know.
FAQ
What is React Native?
Also called RN, React Native is a well-known mobile app framework based on JavaScript. It permits you to create natively-rendered mobile apps on both Android and iOS platforms.
Why use React Native?
– Cross-Platform
– Time-and Cost-efficient
– Superb Performance
– Over-the-Air updates & Hot Reloading
– Open-Source and No Vendor Lock-In
What are the steps to create a React Native app?
– Write Down Your High-level Idea
– Wireframe, Mockup, and Prototype Your App
– Obtain Feedback from Customers
– Create Your App Backend
– Code Your App Frontend
– Coding Your React Native App
– Create Your App Landing Page
– Implement Your App Analytics Dashboard
– Beta Test Your App with Real Users
– Optimize Your App for SEO
– Launch Your App
– Promote Your App to Reach the Right Users
– Improve Your App with Customer Feedback
Can You Build An App Using Only React Native
Source: https://blog.back4app.com/how-to-make-an-app-in-react-native/
Posted by: haleyanswerpose.blogspot.com
0 Response to "Can You Build An App Using Only React Native"
Post a Comment